Description
The racer will be able to gradually add downforce to find the ‘sweet spot.’ This is where maximum downforce is being applied without sacrificing speed. Slight adjustments may need to be made throughout an event, due to changing track conditions, or tuning and suspension adjustments. The ability to adjust the spoiler will provide the racer with an advantage.
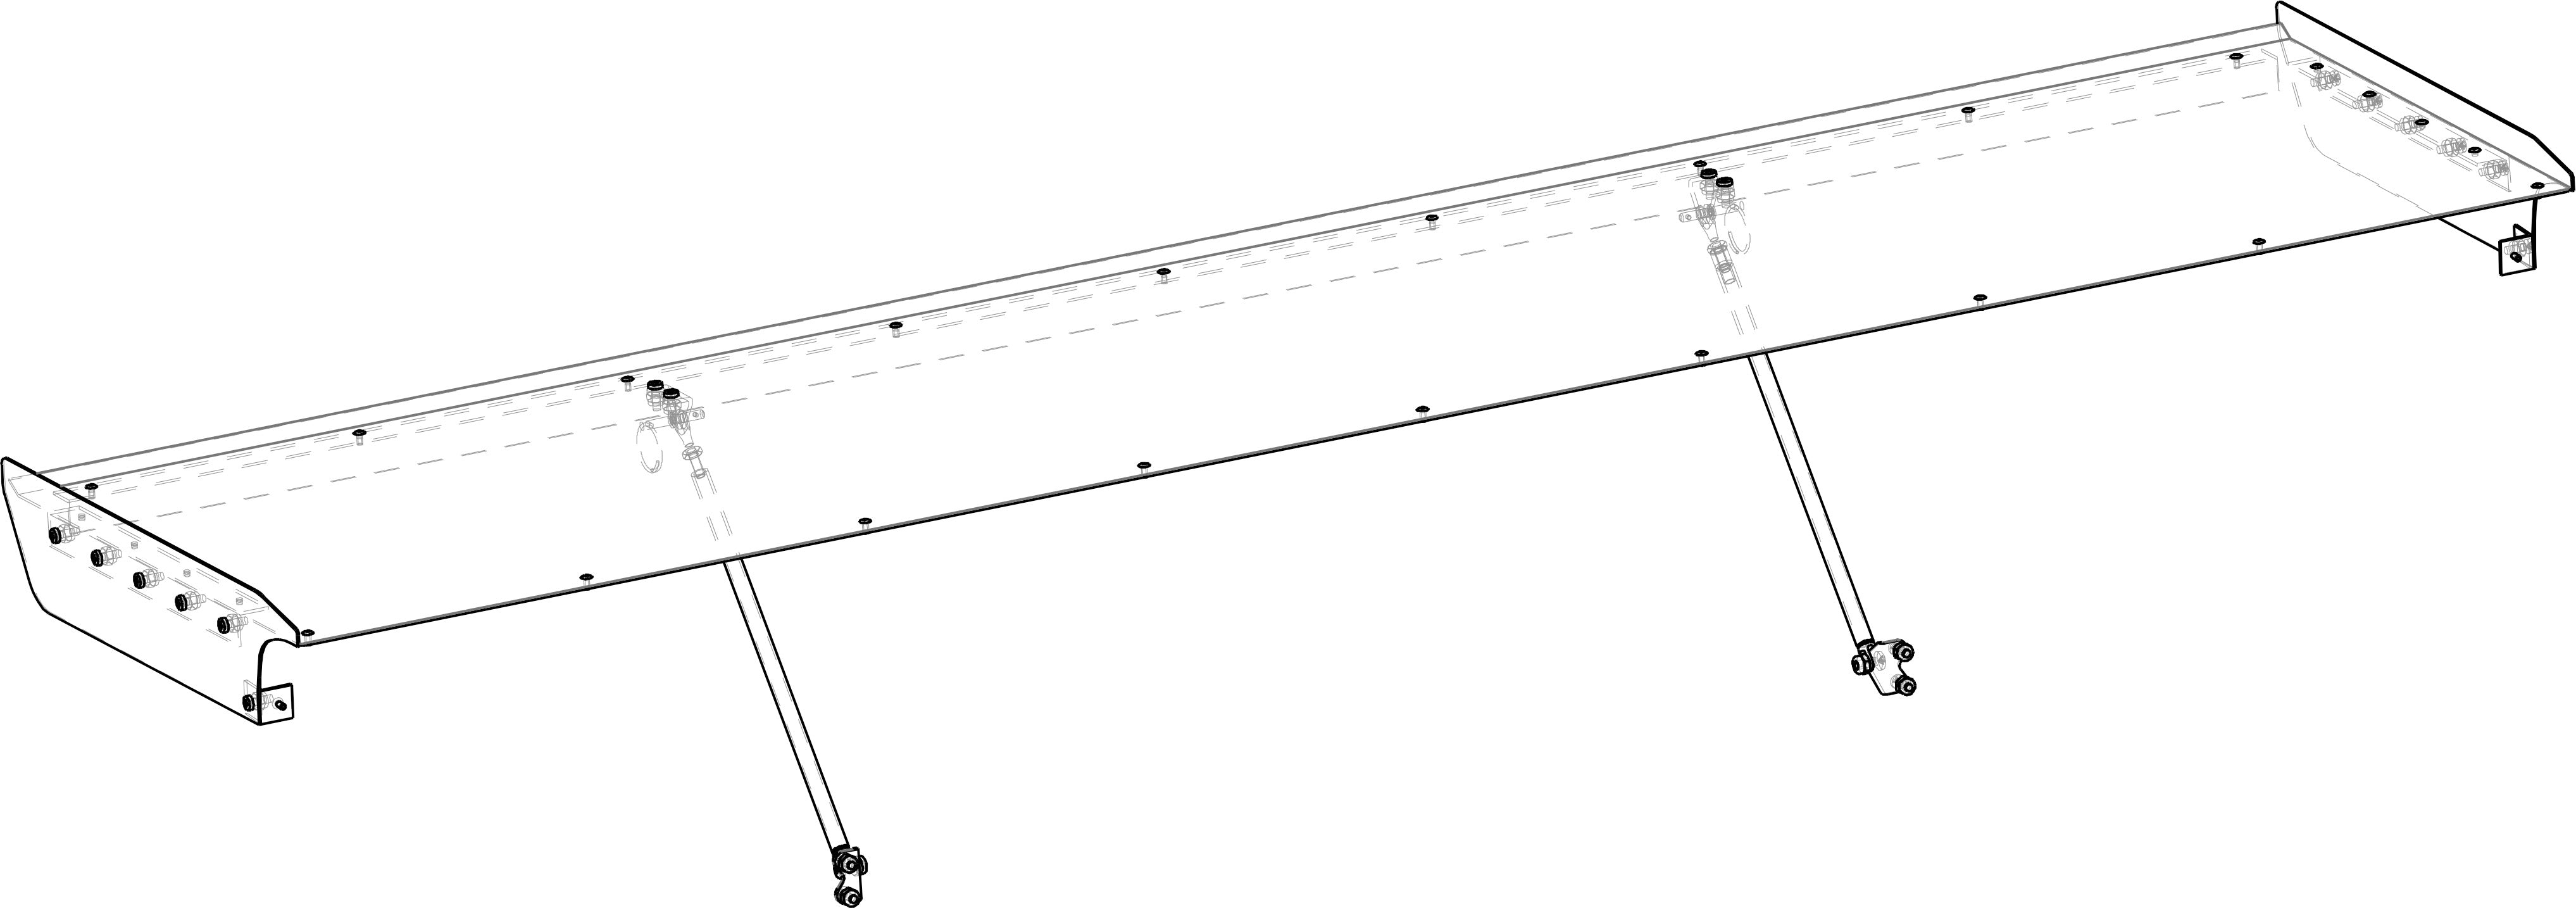
S&W Performance Group's 1994-2004 Chevrolet S10 Pickup Rear Spoiler is made from .050 aluminum. It comes with all necessary hardware and 2 spoiler support rods.
Width: 54"
- Extends 14? off the back of the truck
- Spill plates are 3? x 14?

Bill of Materials
| Item |
Qty |
Part Number |
Description |
| 1 |
1 |
95-705-01 |
Spoiler Deck |
| 2 |
2 |
95-705-02 |
Spill Plate |
| 3 |
2 |
95-703-03 |
Side Support Angle, Spoiler Deck |
| 4 |
2 |
95-703-04 |
Support Tube Assembly |
| 5 |
1 |
95-703-05 |
Stiffener, Spoiler Deck |
| 6 |
2 |
95-703-06 |
Front Angle, Spill Plate |
| 7 |
4 |
95-702-02 |
Mounting Bracket, Support Tube |
| 8 |
2 |
63-067 |
3/16 Threaded Clevis |
| 9 |
2 |
65-508 |
10-32 Hex Nut |
| 10 |
20 |
65-505 |
8-32 x 1/2" Screw |
| 11 |
20 |
65-503 |
8-32 Nylock Nut |
| 12 |
2 |
63-069 |
3/16 Detent Pin |
| 13 |
2 |
65-511 |
10-32 x 1/2" Screw |
| 14 |
2 |
65-507 |
10-32 Nylock Nut |
| 15 |
12 |
65-800 |
1/8" Diameter Pop Rivet, 1/8" Grip |
| 16 |
20 |
65-801 |
1/8" Diameter Pop Rivet, 1/4" Grip |
Installation Instructions
Spoiler Deck Assembly
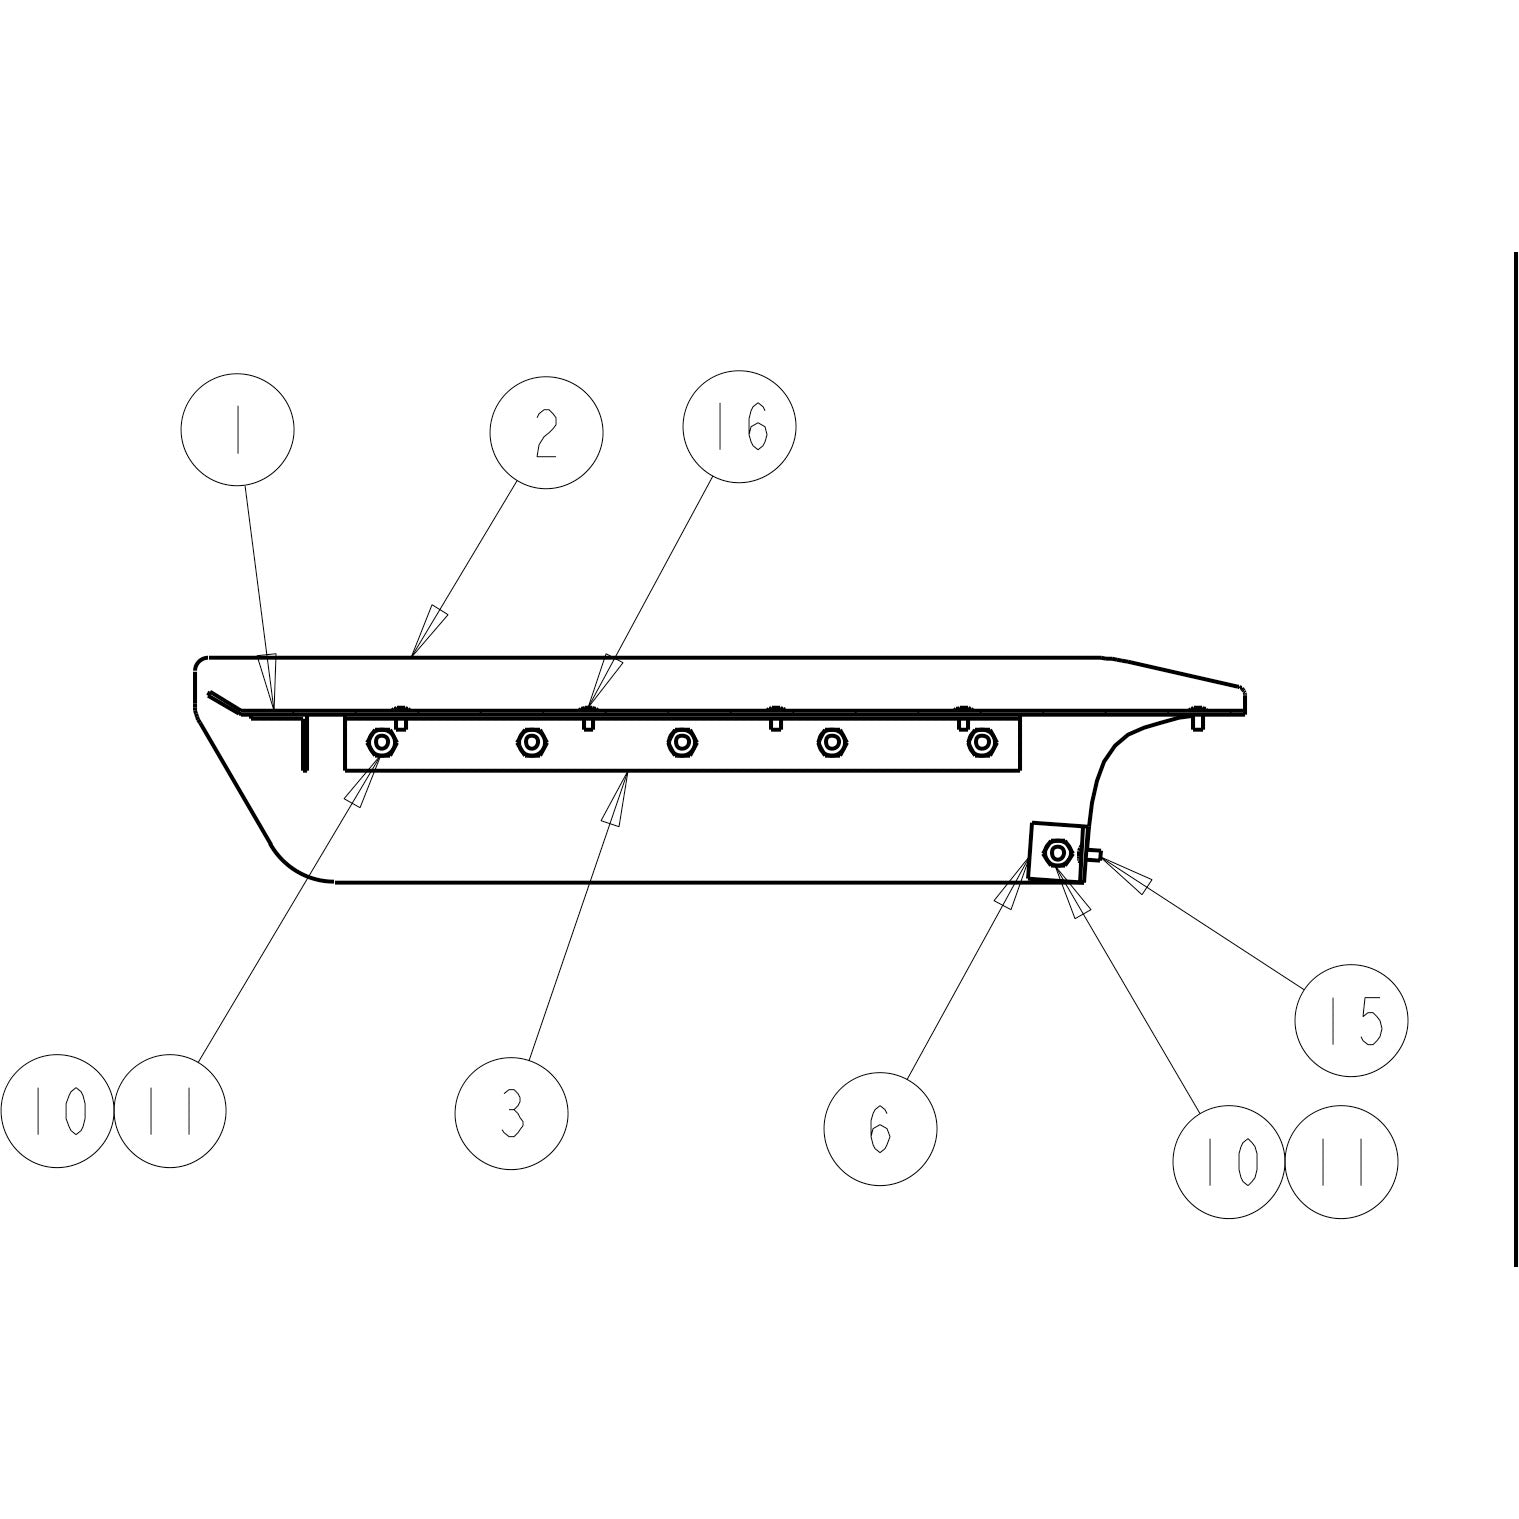
1. Rivet the two Spoiler Deck Side Support Angles (item 3) to the bottom of the Spoiler Deck (Item1). Use (4) 1/8” rivets (item 16) to attach each angle to the deck. The leg of the angle with (5) holes aligns with the side edge of the deck.
2. Rivet the Spoiler Deck Rear Stiffener (item 5) to the bottom of the rear of the Spoiler Deck. The outstanding leg should be toward the front of the spoiler, see Section B-B.
3. Bolt the Spoiler Spill Plates (item 2) to the Side Support Angles. Use only two screws & nuts on each spill pate at this time. You will have to remove them in the next step.
Attach the Spoiler Assembly and Support Angles to the Tail Gate
4. Set the spoiler on the tail gate so that the front edge of the Spill Plates touches the back of the tail gate.
5. Center the spoiler on the tail gate. Mark the center hole of the Spoiler Deck on the tail gate.
6. Remove the spoiler and drill an 1/8” hole in the tail gate at the locations you just marked. Center punching the hole location will reduce the possibility of the drill walking.
7. Temporarily fasten the Spoiler to the trunk using Clecos. Check the position and alignment of the Spoiler Assembly.
8. Position the Spill Plate Front Angles (item 6) against the back surface of the tail gate and the inside of the Spill Plate. The surface with the 1/8” diameter hole goes against the trunk surface. Mark the location of the 1/8” holes on the trunk lid.
9. Repeat this procedure for the other side. Remove the Spoiler Assembly and drill 1/8” holes in each side of the tail gate at the locations you just marked.
10. Set the Spoiler Assembly back on the car and fasten with Clecos.
11. Rivet the Spoiler Front Support Angles to the tail gate.
12. Mark the location of the 3/16” diameter hole in the Spill Plate Front Angles on the inside of the Spill Plates.
13. Remove the Spill Plates and drill 3/16” hole in them.
14. Bolt the Spill Plates to the spoiler angle & front angle.
15. Mark and drill the remaining rivet holes in the tail gate.
Attach Diagonal Supports
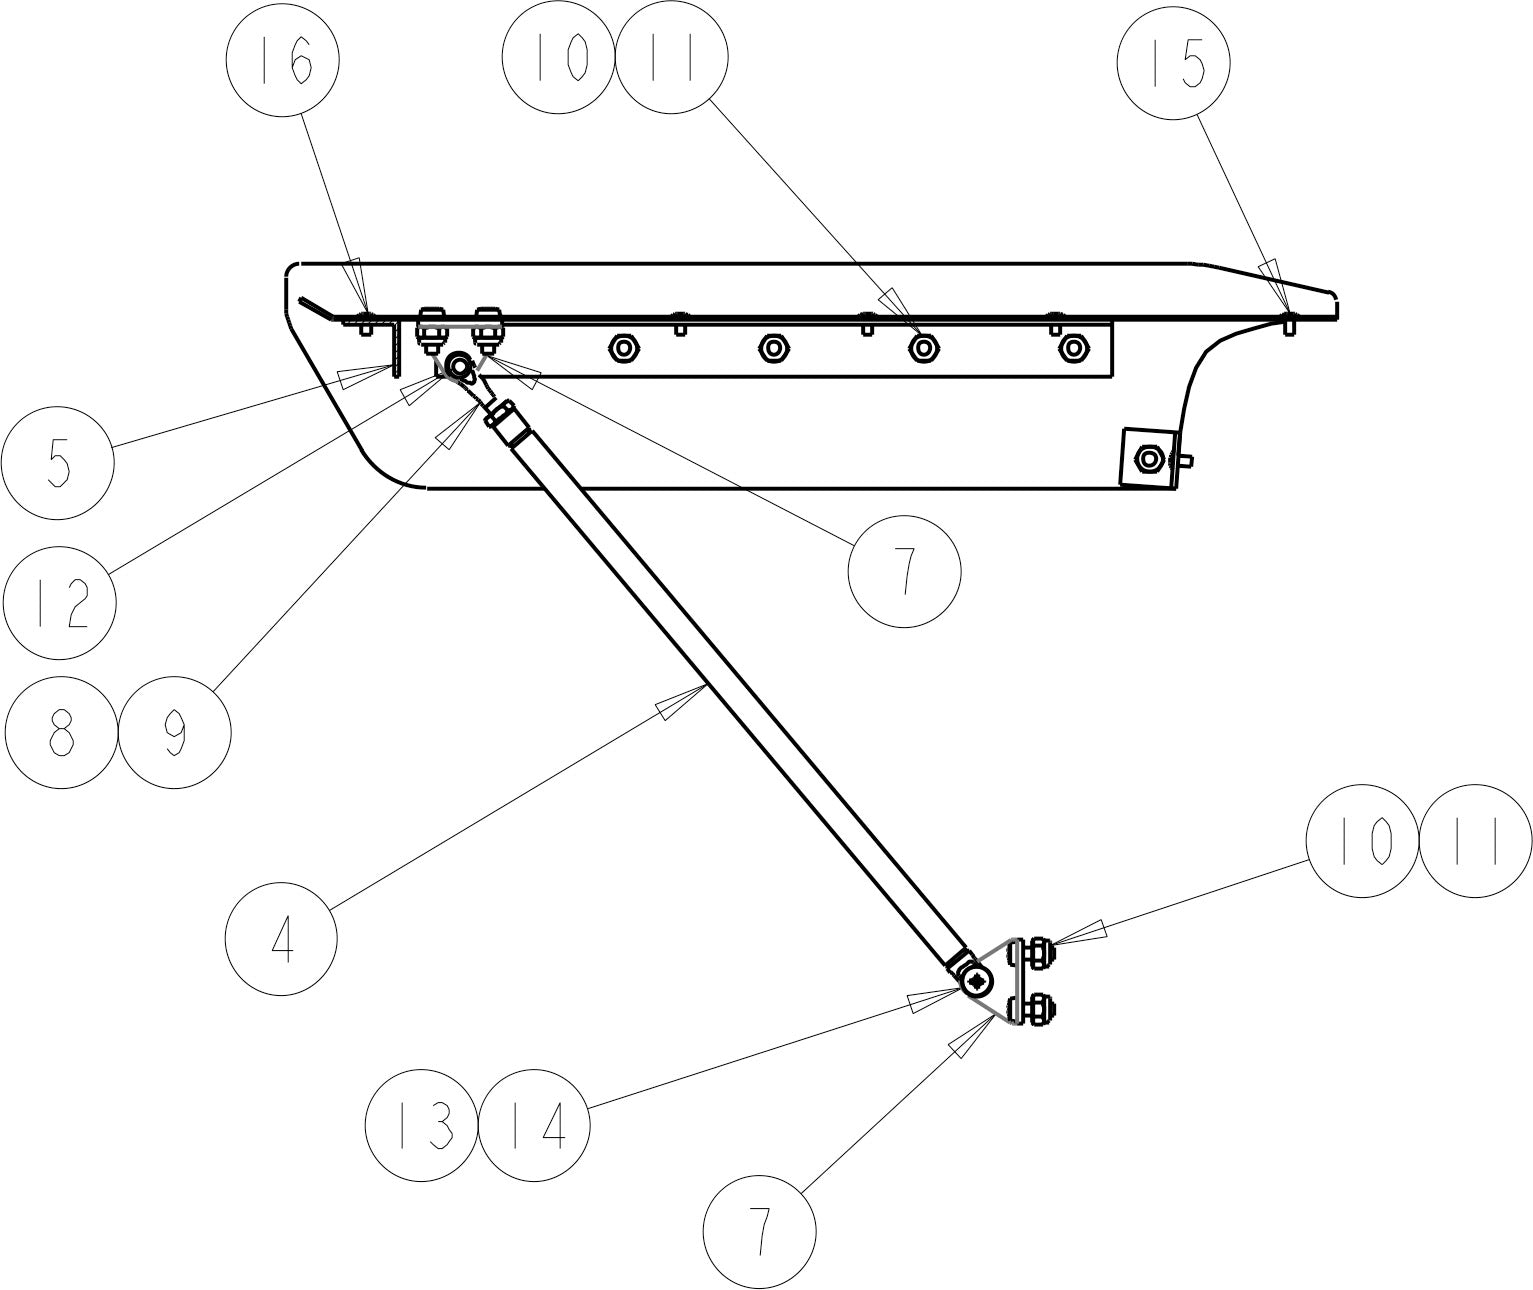
16. Assemble the Spoiler Support Tube (item 4), 10-32 Clevis (item 8) and 10-32 jam nut (Item 9).
17. Bolt the (2) Mounting Brackets (item 7) to the bottom of spoiler deck.
18. Attach the Support Tube to the Mounting Brackets on the Spoiler with Detent Pin (Item 12).
19. Attach the remaining (2) Mounting Brackets to the clevis on the other end of the support tubes.
20. Position the face of mounting brackets against back of tail gate. Mark the location of holes. Drill (4) 5/32” diameter holes through the tail gate. If you a using the stock double wall tail gate you will have to drill access holes in the inner panel.
Specifications
| For Make | Chevrolet |
|---|---|
| For Model | S10 |
| For Year | 1994, 1995, 1996, 1997, 1998, 1999, 2000, 2001, 2002, 2003, and 2004 |
You may also like
Recently viewed
S&W Performance Group
Did you find what you are looking for? If you have any questions get in touch.


